Instalatiion xampp step by step
Jumat, 18 September 2020
Senin, 10 Agustus 2020
How to update Kali?
To update Kali, first ensure that /etc/apt/sources.list is properly populated:
kali@kali:~$ cat /etc/apt/sources.list
deb http://http.kali.org/kali kali-rolling main contrib non-free
deb-src http://http.kali.org/kali kali-rolling main contrib non-free
kali@kali:~$
After that we can run the following commands which will upgrade us to the latest Kali versions:
kali@kali:~$ sudo apt update
kali@kali:~$
kali@kali:~$ sudo apt full-upgrade -y
kali@kali:~$
Jumat, 07 Agustus 2020
Howto Single User in KaliLinux
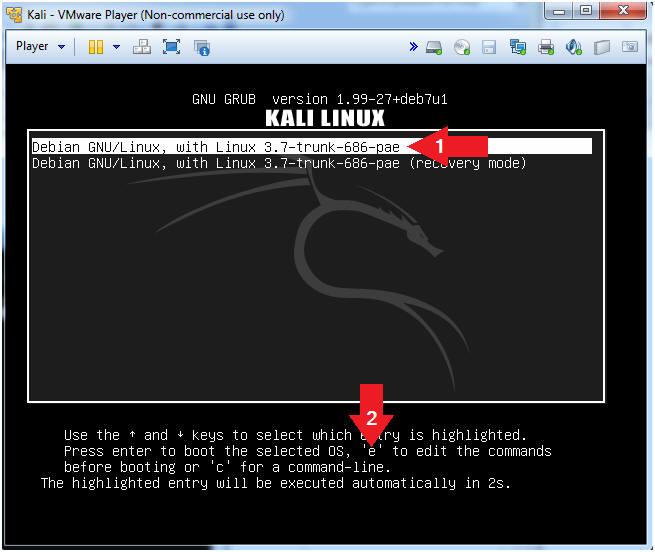
Use Grub to Boot into Single User Mode
- Edit the Grub Menu
- Instructions
- Make sure Debian GNU/Linux, with Linux 3.7-trunk-686-pae is highlighted.
- Press "e".
- Instructions
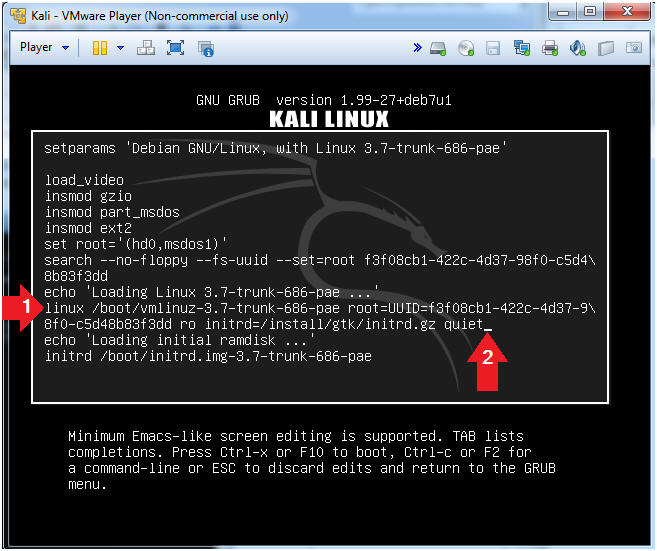
- Cursor Placement
- Instructions
- Cursor down to the line that starts with "linux /boot/vmlinuz-3.7-trunk...".
- Cursor right until the cursor is positioned at the end of the line. In my case, my cursor is directly after the string quiet.
- Continue to next step.
- Instructions
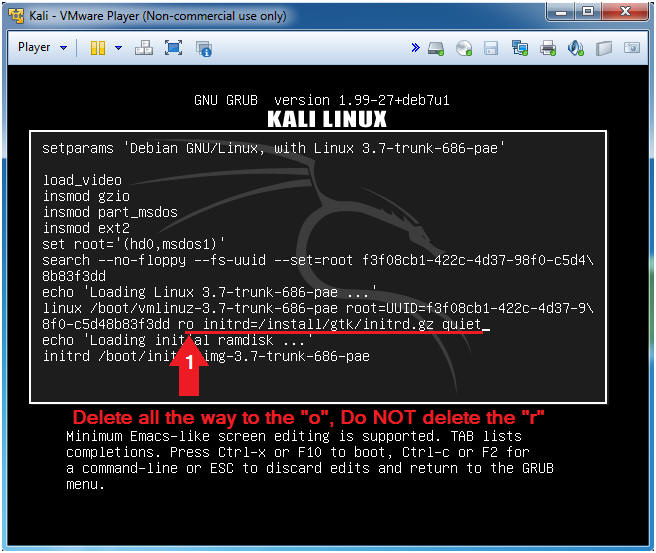
- Delete Some Characters
- Instructions
- Use the backspace key to delete the
following characters:
- "o initrd=/install/gtk/initrd.gz quiet"
- Continue to next step.
- Use the backspace key to delete the
following characters:
- Instructions
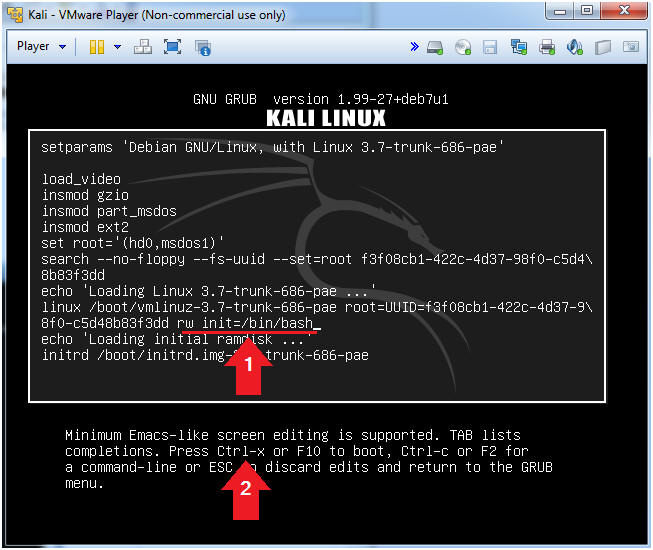
- Add the string "w init=/bin/bash"
- Instructions
- Type the follow string after the "r".
- w init=/bin/bash
- Press <Ctrl> and "x" to boot to single mode.
- Type the follow string after the "r".
- Instructions
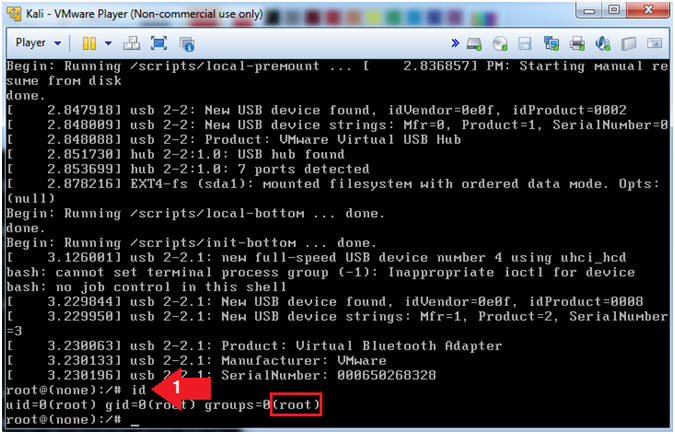
- Welcome to root (Got
Root?)
- Instruction:
- id
- Note(FYI):
- You are the root user. Congrats!!!
- Continue to next section.
- Instruction:
Minggu, 02 Agustus 2020
Troubel in fstab file
Error in file fstabI had a typo in my fstab and it boots to a commandline but is readonly, I know what the error is but i can't change it because it's mounted as readonly. I want to mount the filesystem and make the changes. I know I can boot a live distro and edit it that way, but i was wondering if there was an easier way to do it.
Yes, if you end up in single-user mode with a readonly root, try:
mount / -o remount,rwhat was very easy to correct fstab from readonly mode. We must mount / in read-write mode.
If /etc/fstab is correct, you can simply type:
mount -n -o remount /
But if /etc/fstab is wrong (as it was in my case), you must give the device name and possibly the type, too: e.g.
mount -n -o remount -t extX /dev/hdaX /
Where extX is your filesystem type and /dev/hdaX -- is partition you use for your root mount point.
To see all your available partitions just type ls /dev/[sh]d*.
mount -n -o remount -t extX /dev/hdaX /
I was on Orangepi3 EMMC when I had a typo in UUID of root having ext4 filesystem.
The command remounted in read-write mode and I fixed my fstab
mount -n -o remount -t ext4 /dev/mmcblk2p1 /
Sabtu, 01 Agustus 2020
Make Installer on Linux
How to Make an Ubuntu 18.04 USB Installer on Linux
In this tutorial, we will show you how to create an Ubuntu installer on a USB stick that can be booted from a Linux terminal.
You can use this USB stick to boot and test or install Ubuntu on any computer that supports booting from USB.
Precondition
USB stick drive 4GB or larger
The computer runs a Linux distribution
Ubuntu ISO file. Visit the Ubuntu download page where you can find download links for Ubuntu Desktop, Ubuntu Server and various Ubuntu flavors.
Make a Bootable Ubuntu 18.04 USB Stick on Linux
Although there are many GUI tools that allow you to flash ISO images to a USB drive, in this tutorial, we will make a bootable Ubuntu 18.04 USB using the dd command.
Making a Bootable Ubuntu 18.04 USB Stick on Linux is a quick and easy process, just follow the steps outlined below.
Insert the USB flash drive into the USB port.
Find out the name of the USB drive with the lsblk command:
lsblk
The output will look like this:
MAJ NAME: MIN RM SIZE RO TYPE MOUNTPOINT
sda 8: 0 0 465.8G 0 disk
└─sda1 8: 1 0 465.8G 0 parts / data
sdx 8:16 1 7.5G 0 disk
└─sdx1 8:17 1 7.5G 0 part / run / media / linuxid / Kingston
nvme0n1 259: 0 0 232.9G 0 disk
├─nvme0n1p1 259: 1 0 512M 0 parts / boot
├─nvme0n1p2 259: 2 0 16G 0 part [SWAP]
└─nvme0n1p3 259: 3 0 216.4G 0 part /
As you can see from the output above, the USB device is / dev / sdx but this might be different on your system.
Most Linux distributions will automatically mount a USB flash drive when inserted. Before flashing the image, make sure the USB device is unmounted. To do this, use the umount command followed by the directory where it was mounted (mount point) or the name of the device:
sudo umount / dev / sdx1
The final step is to flash the Ubuntu ISO image to a USB drive. Make sure you replace / dev / sdx with your drive and not add the partition number. For /path/to/ubuntu-18.04.2-desktop-amd64 is the path to the ISO file. If you download a file using a web browser, the file will be stored in the Download folder located in your user account.
sudo dd bs = 4M if = / path / to / ubuntu-18.04.2-desktop-amd64.iso of = / dev / sdx status = progress oflag = sync
The command will display a progress bar when flashing the image.
The process may take several minutes, depending on the ISO file size and USB stick write speed.
When finished you will see an output similar to the one below:
458 + 1 records ina
458 + 1 records out
1921843200 bytes (1.9 GB, 1.8 GiB) copied, 147,006 s, 13 MB / s
At this point you already have an Ubuntu installer that can boot on your USB stick.
fix file fstab
How to fix /etc/fstab be come readonly filesystem
If a filesystem has been mounted read-only, chmodwill not work since it's a write operation too.
Try remounting it read-write:
sudo mount -o remount,rw '/dev/sdax'If the device has a write lock on it (like SD memory cards), you need to turn it off. Hardware locks cannot be disabled by software. Note that the write lock on SD memory cards is located from the sight you see the letters near the up left corner and it looks like a very small switch.
Some filesystem drivers may also not support write operations, this is the case with the older NTFS module supported by Linux. For NTFS filesystems, be sure to use the ntfs-3g driver which should be picked automatically nowadays. If not, you can force the driver with something like:
sudo mount -t ntfs-3g -o uid=$(id -u) /dev/sdax /mnt/
(where /dev/sdbx has to be substituted for your block device and /mnt/ for your destination)
Selasa, 05 Mei 2009
Quota User in Linux
For the implementation of disk quotas following these steps:
1.Check whether your hard drive / and /home one partition or no.
1.Edit file /etc/fstab
/dev/hda5 /home ext3 defaults,usrquota,grpquota 1 2
2. Make files db quota
touch /home/aquota.user
touch /home/aquota.group
3.Remount File System
mount -oremount /home
4.Make table current disk usage per file system
quotacheck -vug /home -m
5.quotaon
quotaon -vug /home
6.List quota
repquota -a
7. Make quota per user
setquota -u very 100000 110000 0 0 -a
have i nice try.
Langganan:
Komentar (Atom)